1.概述
HeapByteBuffer即堆内字节缓冲区,缓冲数据存储在父类ByteBuffer的hb属性中,内存空间的申请与释放完全由JVM负责,不用考虑内存回收的问题。在向IO设备写入数据时,需要将字节数组从JVM拷贝到Linux内核,而JVM除了CMS收集器,在GC时都有几率改变堆对象的内存地址,而内核对这种改变是无法感知的,会导致拷贝到Linux过程中出错。
因此HeapByteBuffer向IO设备写入数据时,会先将字节数组从JVM堆内拷贝到堆外,堆外就是Java进程的非JVM区域的用户空间,最后在从堆外拷贝到Linux内核空间。因此HeapByteBuffer相对于MappedByteBuffer、DirectByteBuffer来说,使用简单但效率低。
2.构造与创建方式
2.1 构造器
1
2
3
4
5
6
7
8
9
10
11
12
|
HeapByteBuffer(int cap, int lim) {
	super(-1, 0, lim, cap, new byte[cap], 0);
}

HeapByteBuffer(byte[] buf, int off, int len) {
	super(-1, off, off + len, buf.length, buf, 0);
}

protected HeapByteBuffer(byte[] buf, int mark, int pos, int lim, int cap, int off){
	super(mark, pos, lim, cap, buf, off);
}
|
HeapByteBuffer的构造器逻辑非常简单,就是初始化必要的属性值,与ByteBuffer、Buffer一样不对外提供访问权限,因此也无法通过继承的形式,重写部分方法的功能。
2.2 创建方式
1
2
3
4
5
6
7
8
9
10
11
12
|
public ByteBuffer slice() {
	 return new HeapByteBuffer(hb, -1, 0, this.remaining(), this.remaining(), this.position() + offset);
   }

public ByteBuffer duplicate() {
       return new HeapByteBuffer(hb, this.markValue(), this.position(), this.limit(), this.capacity(), offset);
   }

   public ByteBuffer asReadOnlyBuffer() {
   	return new HeapByteBufferR(hb, this.markValue(), this.position(), this.limit(), this.capacity(), offset);
   }
|
这三个方法都是对ByteBuffer抽象方法的重写,主要的作用之前也提过了,接下来写个demo看看这三个方法的创建效果:
1
2
3
4
5
6
7
8
9
10
11
12
13
14
15
16
17
18
| public static void main(String[] args) {
ByteBuffer byteBuffer = ByteBuffer.allocate(10);
byteBuffer.put((byte)7);
byteBuffer.put((byte)8);
byteBuffer.put((byte)9);
byteBuffer.mark();
byteBuffer.put((byte)10);
byteBuffer.put((byte)11);
byteBuffer.put((byte)12);
byteBuffer.put((byte)13);
ByteBuffer slice = byteBuffer.slice();
ByteBuffer duplicate = byteBuffer.duplicate();
ByteBuffer asReadOnlyBuffer = byteBuffer.asReadOnlyBuffer();
}
|
原始缓冲区和新创建的三个缓冲区主要属性值:
| 缓冲区 |
position |
limit |
capacity |
mark |
offset |
hb |
| byteBuffer |
7 |
10 |
10 |
3 |
0 |
[7, 8, 9, 10, 11, 12, 13, 0, 0, 0] |
| slice |
0 |
3 |
3 |
0 |
7 |
[7, 8, 9, 10, 11, 12, 13, 0, 0, 0] |
| duplicate |
7 |
10 |
10 |
3 |
0 |
[7, 8, 9, 10, 11, 12, 13, 0, 0, 0] |
| asReadOnlyBuffer |
7 |
10 |
10 |
3 |
0 |
[7, 8, 9, 10, 11, 12, 13, 0, 0, 0] |
duplicate()方法与asReadOnlyBuffer()方法,对于关键的属性是完全复制,slice()方法则是将新建缓冲区的position强制设置为0,mark强制设置为-1,但offset设置为原缓冲区的position值。也就是说slice()方法创建出来的缓冲区,还是按照原缓冲区的位置继续往后读写。
slice翻译成中文是切/割的意思,所以slice()方法的本质,就是将原缓冲区的数据切出一部分建立新的缓冲区。虽然在最终效果上新的缓冲区的hb属性仍然包含全部数据,但由于核心属性的限制,新缓冲区对hb数组能读写的范围有限,只能是原缓冲区未读写部分,也就是将原缓冲区position以及往后的位置切了下来。
以上面的代码为例,未读写部分即hb数组的7-9坐标,切出来的缓冲区的offset值为7,这个值没有任何地方可以修改,由于每次读写都是基于position + offset的位置,因此hb数组0-6坐标是没办法操作的。capacity值为3,也没办法进行修改,因此limit即使修改也只能改成1-3,数组可操作坐标就不会超出9。
3.功能方法
3.1 读写方法
读取相关方法1
2
3
4
5
6
7
8
9
10
11
12
13
14
15
16
17
18
19
20
21
22
23
24
25
|
protected int ix(int i) {
return i + offset;
}
public byte get() {
return hb[ix(nextGetIndex())];
}
public byte get(int i) {
return hb[ix(checkIndex(i))];
}
public ByteBuffer get(byte[] dst, int offset, int length) {
checkBounds(offset, length, dst.length);
if (length > remaining())
throw new BufferUnderflowException();
System.arraycopy(hb, ix(position()), dst, offset, length);
position(position() + length);
return this;
}
|
写入方法1
2
3
4
5
6
7
8
9
10
11
12
13
14
15
16
17
18
19
20
21
22
23
24
25
26
27
28
29
30
31
32
33
34
35
36
37
38
39
40
|
public ByteBuffer put(byte[] src, int offset, int length) {
checkBounds(offset, length, src.length);
if (length > remaining())
throw new BufferOverflowException();
System.arraycopy(src, offset, hb, ix(position()), length);
position(position() + length);
return this;
}
public ByteBuffer put(ByteBuffer src) {
if (src instanceof HeapByteBuffer) {
if (src == this)
throw new IllegalArgumentException();
HeapByteBuffer sb = (HeapByteBuffer)src;
int n = sb.remaining();
if (n > remaining())
throw new BufferOverflowException();
System.arraycopy(sb.hb, sb.ix(sb.position()),
hb, ix(position()), n);
sb.position(sb.position() + n);
position(position() + n);
} else if (src.isDirect()) {
int n = src.remaining();
if (n > remaining())
throw new BufferOverflowException();
src.get(hb, ix(position()), n);
position(position() + n);
} else {
super.put(src);
}
return this;
}
|
关于批量读写的相关方法,ByteBuffer其实已经基于单个读写方法进行封装了,HeapByteBuffer为了提高效率进行了重写,将所有for循环形式的数组复制,改用System.arraycopy()方法代替,提高执行效率。剩下的就是一些读写时必要的校验、对position属性的维护等细节,基本没什么阅读难度。
3.2 其他方法
1
2
3
4
5
6
7
8
9
10
11
12
13
14
15
16
17
18
19
20
21
22
23
24
25
|
public boolean isDirect() {
return false;
}
public boolean isReadOnly() {
return false;
}
public ByteBuffer compact() {
System.arraycopy(hb, ix(position()), hb, ix(0), remaining());
position(remaining());
limit(capacity());
discardMark();
return this;
}
|
值得一提的只有compact()方法,Buffer抽象类提供了3种清理缓冲区数据的方法,但Buffer并不知道缓冲数据的具体情况,因此清理的方式比较简单粗暴,直接将position重置为0,取消mark坐标等,虽然缓冲区的数据仍然存在,但是后面持续的写入,会将原有数据全部覆盖掉。
HeapByteBuffer类已经能确定缓冲数据存储的内存位置、单位,因此可以提供更精准的清理功能,这个功能就是compact()方法,下面是使用demo:
1
2
3
4
5
6
7
8
9
10
11
12
13
14
15
16
17
18
19
20
21
22
23
24
25
26
27
| public static void main(String[] args) {
ByteBuffer byteBuffer = ByteBuffer.allocate(10);
byteBuffer.put((byte)1);
byteBuffer.put((byte)2);
byteBuffer.put((byte)3);
byteBuffer.put((byte)4);
byteBuffer.put((byte)5);
byteBuffer.put((byte)6);
byteBuffer.put((byte)7);
byteBuffer.flip();
byteBuffer.get();
byteBuffer.get();
byteBuffer.compact();
System.out.println( Arrays.toString(byteBuffer.array()));
}
|
代码执行到每个步骤时,缓冲区对象的内部属性变化:
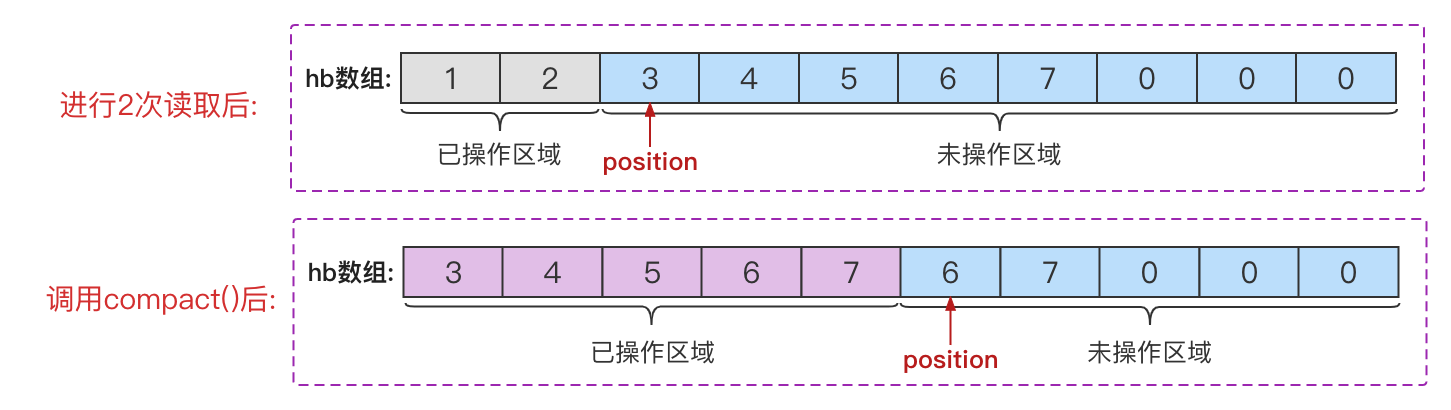
图中可以看出,comapct()方法只是将原position位置往后的多个元素,挪到数组的开始位置,其他位置的元素不发生任何变化。因此无论是comapct()方法,还是Buffer提供的clear()、flip()、rewind()方法,都是在读完需要写入的时候使用。